Challah bread has a reputation for being beautiful, rich, and slightly intimidating. With its glossy braided shape and soft, golden crumb, many home bakers assume it must be complicated. But here’s the good news: you won’t believe how easy this challah bread recipe is!
In this detailed, SEO-optimized guide, you’ll discover how simple it is to make homemade challah bread using basic ingredients and straightforward steps. Whether you’re baking for a holiday, a weekend family meal, or just because you love fresh bread, this article is designed for readers in the United States, United Kingdom, and Canada who want reliable, delicious results.
Let’s break the process down and reveal just how approachable challah baking can be.
Introduction: Why Challah Bread Is So Loved
Challah is a traditional enriched bread, often associated with Jewish cuisine and special occasions. What makes it special is its:
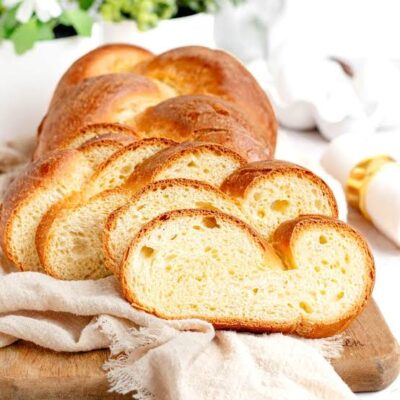
Soft, fluffy texture
Slightly sweet flavor
Beautiful braided appearance
Versatility for sweet or savory dishes
Despite its elegant look, the truth is simple: you won’t believe how easy this challah bread recipe is once you understand the basics.
What Makes Challah Bread Different? (H2)
Before baking, it helps to know what sets challah apart from regular bread.
Key Characteristics of Challah (H3)
Made with eggs and oil instead of butter
Lightly sweetened with sugar or honey
Braided before baking
Often topped with seeds like sesame or poppy
These elements give challah its tender crumb and golden color—without adding difficulty.
Ingredients You Already Have at Home (H2)
One reason people love this recipe is how accessible the ingredients are.
Basic Challah Bread Ingredients (H3)
All-purpose flour
Active dry yeast or instant yeast
Warm water
Eggs
Sugar or honey
Vegetable oil or olive oil
Salt
💡 Tip: All-purpose flour works perfectly, making this challah bread recipe easy for home bakers across North America and the UK.
Why This Challah Bread Recipe Is So Easy (H2)
Many bread recipes fail because they’re overly technical. This one works because it focuses on:
Simple kneading
One main rise
Forgiving dough
Clear visual cues
That’s why so many first-time bakers say, “You won’t believe how easy this challah bread recipe is!”
Step-by-Step: Easy Challah Bread Method (H2)
Step 1: Activate the Yeast (H3)
Mix warm water with yeast and sugar
Let it sit for 5–10 minutes until foamy
This step ensures your yeast is alive and ready.
Step 2: Mix the Dough (H3)
Add eggs, oil, salt, and flour gradually
Stir until a soft dough forms
The dough should be slightly tacky but not sticky.
Step 3: Knead Until Smooth (H3)
Knead by hand or mixer for 8–10 minutes
Dough should be smooth and elastic
✨ Secret: If the dough springs back gently when pressed, it’s ready.
The First Rise: Easier Than You Think (H2)
Place dough in a lightly oiled bowl
Cover and let rise for 1–2 hours
Dough should double in size
You don’t need perfect timing—challah dough is forgiving.
How to Braid Challah Without Stress (H2)
Braiding looks impressive but is surprisingly simple.
Easy 3-Strand Braid (H3)
Divide dough into three equal pieces
Roll each into a rope
Braid like hair
Tuck the ends under
That’s it! This is another reason you won’t believe how easy this challah bread recipe is.
💡 Optional: Try a 4- or 6-strand braid once you’re comfortable.
Egg Wash: The Golden Secret (H2)
Brushing challah with egg wash gives it that iconic shine.
Simple Egg Wash (H3)
1 egg
1 tablespoon water
Brush gently before baking. Add seeds if desired.
Baking the Challah to Perfection (H2)
Bake at 350°F / 175°C
Time: 30–40 minutes
Bread should sound hollow when tapped
If browning too fast, tent loosely with foil.
Practical Tips for Foolproof Challah (H2)
These tips make this easy challah bread recipe even more reliable:
Use room-temperature eggs
Measure flour carefully (spoon and level)
Don’t rush the rise
Avoid overbaking
⭐ Pro tip: Slightly underbaked challah stays softer longer.
Common Mistakes to Avoid (H2)
Even easy recipes can fail if these happen:
Using water that’s too hot (kills yeast)
Adding too much flour
Skipping the egg wash
Cutting before cooling
Let the bread cool for at least 30 minutes for best texture.
How to Store and Use Challah Bread (H2)
Storage Tips (H3)
Keep wrapped at room temperature for 2 days
Freeze sliced challah up to 2 months
Delicious Ways to Enjoy Challah (H3)
French toast
Sandwich bread
Bread pudding
Toast with honey or jam
Challah’s rich texture makes it incredibly versatile.
Why Home Bakers Love This Recipe (H2)
Across the US, UK, and Canada, home bakers love challah because:
It looks impressive
The process is relaxing
The results feel special
The recipe is approachable
Once you try it, you’ll understand why people keep saying,
“You won’t believe how easy this challah bread recipe is!”
Conclusion: Beautiful Bread Made Simple
Challah bread may look like a bakery masterpiece, but it doesn’t require professional skills. With simple ingredients, clear steps, and a little patience, anyone can bake it at home.
Now that you know the secrets, you truly won’t believe how easy this challah bread recipe is—and how rewarding it feels to slice into a loaf you made yourself.
✨ Next step: Would you like a whole wheat challah version, a no-knead option, or a festive braided variation? Just let me know!