Few things compare to the joy of warm, fluffy pita bread fresh out of the oven. Whether you stuff it with falafel and hummus, use it as a wrap for grilled meats, or simply tear it apart to dip in olive oil, pita is one of the most versatile breads in the world. Originating in the Middle East and Mediterranean regions, this simple flatbread has become a global favorite.
If you’ve ever wondered how to make pita bread at home, you’ll be surprised at how approachable it is. With just a handful of ingredients—flour, water, yeast, salt, and olive oil—you can create perfectly puffed pita that rivals your local bakery. In this guide, we’ll uncover the best tips for pita bread recipe success, from kneading techniques and baking methods to storage hacks and creative serving ideas.
Why Make Pita Bread at Home?
🌿 Freshness: Nothing beats the flavor of homemade bread.
🍞 Control: Choose your own ingredients—whole wheat, gluten-free, or organic.
💰 Budget-friendly: Homemade pita costs far less than store-bought.
🥙 Versatility: Works as bread, wrap, pizza base, or dipping tool.
🧑🍳 Satisfying: Watching pita puff up in the oven is pure kitchen magic!
Basic Pita Bread Recipe
Here’s a classic pita bread recipe to get you started:
Ingredients
3 cups all-purpose flour (or 50/50 all-purpose and whole wheat)
1 packet (2 ¼ tsp) active dry yeast
1 cup warm water (110°F/45°C)
1 tbsp olive oil
1 tsp sugar
1 tsp salt
Instructions
Activate Yeast – Mix warm water, sugar, and yeast in a bowl. Let sit 5–10 minutes until foamy.
Make Dough – Add flour, salt, and olive oil. Mix until combined.
Knead – Knead for about 8–10 minutes until smooth and elastic.
First Rise – Place dough in an oiled bowl, cover, and let rise 1–2 hours until doubled.
Shape – Divide dough into 8 balls. Roll each into a ¼-inch-thick circle.
Second Rise – Let circles rest for 20 minutes.
Bake or Cook – Bake at 475°F (245°C) for 5–7 minutes OR cook on a hot skillet until puffed and golden.
Best Tips for Perfect Pita Bread
1. Get the Temperature Right
High heat is the secret to puffing. Preheat your oven and baking stone or sheet pan until very hot—this creates steam that makes the pita pocket.
2. Don’t Roll Too Thin
Pitas need to be about ¼-inch thick. Too thin, and they won’t puff properly; too thick, and they may not form pockets.
3. Use a Baking Stone
If you have one, use a baking stone for even heat and authentic texture. A heavy sheet pan works as an alternative.
4. Resting Time Matters
Allowing dough to rest before baking relaxes the gluten and helps the pita puff evenly.
5. Skillet Method for Softer Pita
If you prefer softer, chewier pitas, cook them in a cast iron skillet instead of baking. Flip once bubbles form.
Variations to Try
Whole Wheat Pita: Replace half or all the flour with whole wheat flour for a nutty flavor.
Garlic & Herb Pita: Add minced garlic and dried herbs to the dough.
Stuffed Pita: Before baking, tuck in cheese or sautéed onions for a delicious surprise.
Gluten-Free Pita: Use a gluten-free flour blend, though texture will differ slightly.
Serving Ideas
Pita bread is endlessly versatile. Try these ideas:
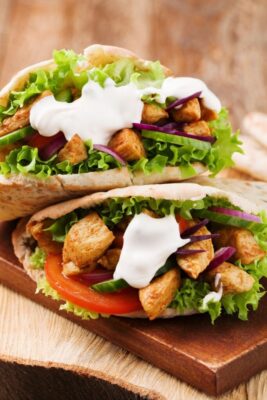
🥙 Stuffed Pita Sandwiches: Fill with falafel, grilled chicken, or gyro meat with salad.
🧆 With Dips: Perfect for hummus, baba ganoush, or tzatziki.
🍕 Pita Pizza: Use as a quick pizza crust with sauce, cheese, and toppings.
🥗 Salad Companion: Serve alongside Greek or Mediterranean salads.
🌯 Breakfast Wraps: Fill with scrambled eggs, avocado, and cheese.
Storage Tips
Room Temperature: Store in an airtight bag for up to 3 days.
Freezing: Wrap and freeze for up to 3 months. Reheat in the oven or toaster.
Revive: Sprinkle with a little water and warm in the oven for soft, fresh-tasting pita.
Common Mistakes to Avoid
Skipping the Preheat – Cold pans won’t puff the pita.
Overproofing – Dough that rises too long can collapse during baking.
Too Much Flour When Rolling – Extra flour can prevent pockets from forming.
Not Enough Steam – Make sure your oven is hot enough to create steam inside the dough.
Nutritional Benefits of Pita Bread
Homemade pita is healthier than many store-bought versions, which often contain preservatives. Depending on flour choice, pita can provide:
Carbohydrates for energy.
Fiber (especially with whole wheat flour).
Protein (enhanced when paired with legumes or meats).
Conclusion
Making pita bread at home may sound intimidating, but once you’ve tried it, you’ll realize it’s both simple and rewarding. With just a handful of ingredients and a few insider tricks, you can bake pita that’s soft, fluffy, and perfect for stuffing or dipping.
By following these best tips for pita bread recipe success, you’ll never look at store-bought pita the same way again. Whether you’re crafting a Mediterranean feast or just want fresh bread for the week, homemade pita is the upgrade your kitchen needs.
🥙 Soft, versatile, and delicious—homemade pita bread truly transforms your meals!