If you’re craving a sweet, crunchy, and chewy dessert that’s as nostalgic as it is delicious, you’re in for a treat — literally! The original Rice Krispie Treats recipe is a timeless classic loved by kids and adults alike. Whether you’re making them for a party, school lunch, or just a cozy movie night at home, these marshmallow squares are simple to make and impossible to resist.
In this guide, you’ll learn exactly how to make the original Rice Krispie Treats recipe — the one that started it all — with tips for perfect texture and fun variations to try.
Let’s get started! 🍫✨
🍚 Introduction
Rice Krispie Treats have been delighting dessert lovers since 1939 when Kellogg’s first introduced the iconic recipe. With just three basic ingredients — butter, marshmallows, and Rice Krispies cereal — you can make this crunchy, gooey snack in minutes.
Best of all, they require no baking, no special equipment, and only a few pantry staples. Whether you’re a beginner cook or a dessert pro, this is one recipe you’ll want to keep forever.
So grab your spatula and try this Rice Krispie Treats original recipe today!
🧈 Ingredients
You’ll only need three simple ingredients for the classic version:
3 tablespoons butter (salted or unsalted — your choice)
1 (10-ounce) bag of marshmallows (about 40 regular or 6 cups mini)
6 cups Rice Krispies cereal
Optional but delicious add-ins:
½ teaspoon vanilla extract (for extra flavor)
A pinch of salt (enhances sweetness)
Sprinkles, chocolate chips, or peanut butter drizzle for a fun twist
🍯 Step-by-Step Instructions
Step 1: Prepare Your Pan
Grease a 9×13-inch baking dish lightly with butter or cooking spray. You can also line it with parchment paper for easy removal.
Step 2: Melt the Butter
In a large saucepan over low heat, melt the butter. Stir continuously to prevent it from browning.
👉 Tip: If you love extra-rich flavor, let the butter brown slightly for a caramel-like note — this creates “brown butter Rice Krispie Treats.”
Step 3: Add the Marshmallows
Once the butter is melted, add the marshmallows. Stir constantly until they melt completely and the mixture becomes smooth and glossy.
You can add vanilla extract or a pinch of salt at this stage for a deeper flavor.
Step 4: Mix in the Rice Krispies Cereal
Remove the pan from heat and immediately add the Rice Krispies cereal. Stir quickly but gently until all the cereal is evenly coated with the marshmallow mixture.
Work fast — the mixture can stiffen as it cools!
Step 5: Press the Mixture into the Pan
Spoon the sticky mixture into your prepared pan. Use a buttered spatula or wax paper to press it down evenly without compacting it too hard (that can make the treats dense).
Let it cool at room temperature for about 30 minutes.
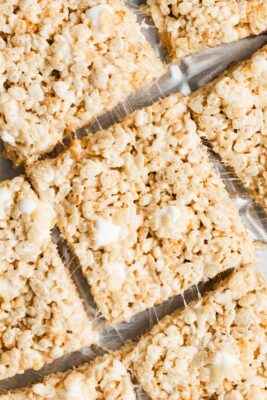
Step 6: Slice and Serve
Once set, cut into squares or rectangles using a sharp knife. Serve immediately or store in an airtight container for later snacking!
🍬 Tips for Perfect Rice Krispie Treats
Use fresh marshmallows – stale ones don’t melt well.
Don’t overheat the butter or marshmallows – low and slow makes for softer, chewier treats.
Don’t overpack the mixture – gently press for light, airy squares.
Store correctly – keep them in an airtight container at room temperature for up to 3 days.
Bonus Tip: Want to keep them extra soft? Add 1 extra cup of mini marshmallows at the end and fold them in partially melted!
🍫 Fun Variations to Try
Once you’ve mastered the original Rice Krispie Treats recipe, have fun customizing it!
🍪 Chocolate Drizzle Rice Krispie Treats
Drizzle melted chocolate (milk, dark, or white) over the top and let it set before cutting.
🥜 Peanut Butter Rice Krispie Treats
Add ½ cup creamy peanut butter to the melted butter and marshmallow mix for a nutty twist.
🌈 Colorful Confetti Treats
Stir in rainbow sprinkles or M&M’s for a festive pop of color — perfect for birthdays and holidays!
🍰 Cookies and Cream Version
Fold in crushed Oreos right before pressing the mixture into the pan.
☕ Mocha Lovers’ Treats
Add a teaspoon of instant espresso powder to the butter for a subtle coffee kick.
🧁 Serving Ideas
These classic Rice Krispie Treats are great on their own, but you can also:
Serve them with ice cream for a fun dessert combo 🍨
Cut them into fun shapes using cookie cutters 🍪
Dip half in melted chocolate and decorate with crushed nuts or sprinkles 🍫
Wrap them individually for party favors or lunchbox snacks 🎁
💡 Storage & Freezing
Room temperature: Store in an airtight container for 2–3 days.
Refrigerator: Keep for up to 1 week (but note — they may harden slightly).
Freezer: Wrap tightly in plastic wrap, then foil, and freeze for up to 2 months. Thaw at room temperature before serving.
🍯 Why You’ll Love This Recipe
Only three ingredients needed
No baking required — quick and simple!
Perfect for kids, parties, and holidays
Deliciously chewy, gooey, and sweet every time
A nostalgic treat that never goes out of style
This recipe captures everything you love about the classic Rice Krispie Treats — from the buttery aroma to that satisfying marshmallow pull.
🎉 Conclusion
When you’re craving something sweet, simple, and satisfying, you can’t go wrong with this Rice Krispie Treats original recipe. It’s quick, kid-friendly, and endlessly customizable — a dessert that’s stood the test of time for good reason.
So grab your marshmallows, melt some butter, and try this Rice Krispie Treats original recipe today! Once you taste that first gooey bite, you’ll understand why it’s been a favorite for generations. 🍯💛