Paper mache is one of the most versatile and fun crafts you can try at home. It allows you to create everything from decorative bowls and sculptures to festive masks and holiday ornaments. Whether you’re a parent looking for a kid-friendly activity, a student seeking a creative project, or a craft enthusiast wanting to explore something new, this Step-by-step guide to paper mache will help you succeed.
If you’ve been searching for a simple, reliable method, then try this paper mache recipe today! This guide covers materials, step-by-step instructions, practical tips, and creative ideas to make your paper mache projects shine.
Why Paper Mache Is Perfect for Everyone
Paper mache has stood the test of time because it’s:
Affordable: Uses everyday household items like newspaper, flour, and water
Eco-friendly: Upcycles old paper and cardboard
Easy to learn: Great for beginners and children
Endlessly creative: From small crafts to large sculptures
By following a trusted paper mache recipe, you can achieve smooth, durable, and professional-looking results without the need for fancy tools or materials.
Materials You’ll Need
Before you start, gather your supplies. These are easy to find in the United States, United Kingdom, and Canada:
Essential Ingredients
2 cups all-purpose flour
3 cups water
1 tablespoon salt (optional, helps prevent mold)
Additional Supplies
Newspaper or scrap paper, torn into strips
A mixing bowl
A whisk or spoon
A balloon, cardboard mold, or other base for your sculpture
Paint and brushes for decorating
With these basic materials, you can create countless projects, from small ornaments to large decorative pieces.
Step-by-Step Guide: Try This Paper Mache Recipe Today!
This simple paper mache recipe combines flour, water, and a touch of salt for a smooth, sticky paste perfect for layering over any surface.
Step 1: Prepare the Paste
In a large bowl, mix 2 cups of flour with 3 cups of water.
Whisk until smooth. There should be no lumps.
Add 1 tablespoon of salt to prevent mold if you plan to keep your creation long-term.
Tip: Warm water can help dissolve the flour faster and make a smoother paste.
Step 2: Prepare Your Base
Choose the form or mold for your project:
Balloon: Perfect for round objects like piñatas or globes
Cardboard cutouts: Great for masks or flat shapes
Wire or other structures: For more advanced 3D sculptures
Make sure your base is sturdy enough to support the layers of paper mache.
Step 3: Tear the Paper
Tear newspaper or scrap paper into strips about 1–2 inches wide
Avoid cutting with scissors; torn edges blend better and reduce visible seams
Tip: Different sizes of strips can help with shaping curves and small details.
Step 4: Dip and Layer
Dip each paper strip into the flour paste.
Remove excess paste by running the strip between your fingers.
Smooth the strip onto your base, overlapping edges slightly.
Step 5: Repeat Layers
Apply at least 3–4 layers for strength
Let each layer dry slightly before adding the next
Smooth out bubbles and wrinkles with your fingers
For larger sculptures, allow each layer to dry completely before adding the next for stability.
Step 6: Drying Your Paper Mache
Place your project in a well-ventilated area
Drying can take 24–48 hours depending on size and humidity
Avoid direct sunlight, which can cause cracking
Tip: Use a fan to speed up drying for larger projects.
Step 7: Decorating
Once dry, your paper mache project is ready for finishing touches:
Paint: Acrylic paints work best for vibrant colors
Sealing: Apply a thin layer of clear varnish for durability
Additional decorations: Glitter, fabric, or markers
You can transform a simple form into a stunning decoration for any room or occasion.
Variations to Try This Paper Mache Recipe Today
Your creativity is the only limit. Here are some variations to inspire your next project:
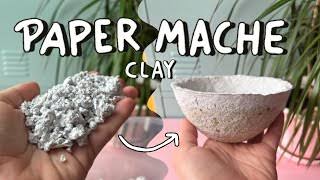
1. Paper Mache Bowls
Use a small bowl as a mold
Apply 3–4 layers of paper strips
Paint and seal for functional or decorative use
2. Paper Mache Masks
Use a face-shaped mold
Apply several layers for stability
Add paint, feathers, or other embellishments
3. Piñatas
Balloon base works perfectly
Apply multiple layers for strength
Once dry, pop the balloon and fill with treats
4. Sculptures and Figurines
Create a wire or cardboard frame
Layer paper mache to build shapes
Paint and detail for realistic or whimsical designs
Practical Tips for Success
Following a few practical tips can ensure your paper mache projects look professional and last longer.
1. Use the Right Paste Consistency
Too thick: hard to spread
Too thin: doesn’t hold the paper well
Aim for pancake-batter consistency.
2. Don’t Rush Drying
Patience is key
Rushing can lead to mold, wrinkles, or cracks
3. Avoid Overlapping Large Pieces
Break paper into manageable strips
Smooth each strip individually for a seamless finish
4. Protect Your Work Surface
Cover tables with plastic or newspaper
Keep a bowl of water nearby for easy cleanup
5. Experiment with Textures
Crumpled paper for a rough surface
Tissue paper for smoother finishes
Why Paper Mache Is Great for All Ages
Paper mache is perfect for everyone, from young children to adults:
Educational: Teaches creativity, patience, and problem-solving
Affordable: Uses simple household items
Eco-friendly: Upcycles old newspaper and scrap paper
Customizable: Projects can be painted, shaped, or decorated endlessly
Whether it’s a solo craft project, a family activity, or a school assignment, paper mache inspires creativity and hands-on learning.
Conclusion: Try This Paper Mache Recipe Today!
There’s no better time to try this paper mache recipe today! It’s easy, fun, and accessible for all skill levels. By following this guide, you’ll be able to create durable, beautiful, and personalized crafts that bring joy to your home, classroom, or community.
Remember, success comes from patience, proper layering, and allowing your project to dry fully. Whether you’re making masks, bowls, or whimsical sculptures, paper mache is a rewarding way to explore your creativity and make lasting art with everyday materials.
Gather your materials, mix your paste, and let your imagination run wild—there’s no limit to what you can create when you try this paper mache recipe today!