Creamy, fragrant, and gently sweet, kheer is one of the most beloved desserts across South Asia—and it has won hearts around the world. Often compared to rice pudding, kheer has a richer depth of flavor thanks to slow cooking, aromatic spices, and nuts. Whether served at festivals, family gatherings, or as a comforting treat at home, a perfect kheer recipe feels both indulgent and nostalgic.
In this ultimate guide, you’ll learn everything you need to know about making kheer at home: ingredients, techniques, variations, expert tips, and common mistakes to avoid. By the end, you’ll understand why this timeless dessert continues to be treasured in kitchens across the United States, United Kingdom, and Canada.
What Is Kheer?
Kheer is a traditional milk-based dessert made by slowly simmering milk with rice (or other grains), sugar, and flavorings such as cardamom, saffron, and nuts. Over time, the milk thickens, the rice softens, and the flavors meld into a luxuriously creamy pudding.
While rice kheer is the most classic version, many regional and modern variations exist, making the kheer recipe incredibly versatile.
Why Kheer Is So Popular
Comfort and Tradition
Kheer is deeply tied to celebration and comfort. It’s commonly prepared for festivals, religious occasions, weddings, and birthdays.
Simple Ingredients, Rich Flavor
With just milk, rice, and sugar, kheer proves that simple ingredients can create extraordinary results when cooked with care.
Adaptable for Modern Kitchens
From stovetop to slow cooker and even instant pot methods, kheer fits easily into today’s cooking styles.
The Classic Kheer Recipe Explained
H2: Essential Ingredients
For a traditional rice kheer recipe, you’ll need:
Full-fat milk
Basmati rice
Sugar (or jaggery)
Cardamom pods or ground cardamom
Chopped nuts (almonds, cashews, pistachios)
Raisins (optional)
Saffron strands (optional)
Using high-quality milk is key to achieving the signature creamy texture.
H2: Step-by-Step Kheer Recipe
H3: Step 1 – Prepare the Rice
Rinse the rice thoroughly until the water runs clear. This removes excess starch while keeping enough to thicken the kheer naturally.
H3: Step 2 – Heat the Milk
In a heavy-bottomed pot, bring milk to a gentle boil. Reduce heat and let it simmer, stirring occasionally to prevent sticking.
H3: Step 3 – Add Rice and Simmer
Add the rinsed rice to the milk and cook on low heat. Stir frequently as the rice cooks and the milk thickens.
H3: Step 4 – Sweeten and Flavor
Once the rice is soft and the mixture thick, add sugar and cardamom. Stir until fully dissolved.
H3: Step 5 – Add Nuts and Finish
Add chopped nuts, raisins, and saffron. Simmer for a few more minutes until fragrant.
Your classic kheer recipe is now ready to serve warm or chilled.
The Secret to Perfect Kheer
H2: Slow Cooking Is Everything
The real secret behind a flawless kheer recipe is patience. Slow simmering allows:
Milk to reduce naturally
Rice to release starch gradually
Flavors to deepen and blend
Rushing the process can result in thin texture or uneven flavor.
Popular Kheer Variations
H2: Vermicelli Kheer (Seviyan Kheer)
Uses thin roasted vermicelli instead of rice for a lighter texture.
H2: Coconut Milk Kheer
A dairy-free alternative using coconut milk, popular for vegan diets.
H2: Sabudana (Tapioca) Kheer
Made with tapioca pearls, offering a chewy, unique texture.
H2: Jaggery Kheer
Uses unrefined jaggery instead of sugar for a deeper, caramel-like sweetness.
These variations prove how flexible the kheer recipe can be.
Kheer vs Rice Pudding
While kheer and rice pudding are often compared, there are key differences:
Kheer uses aromatic spices like cardamom and saffron
Rice pudding often relies on vanilla
Kheer is typically thinner and silkier
Rice pudding is thicker and creamier
Both are delicious, but kheer offers a more complex flavor profile.
Practical Tips for Kheer Success
Use a heavy-bottomed pot to avoid burning
Stir frequently, especially as milk thickens
Adjust sweetness gradually—taste as you go
Add sugar only after rice is fully cooked
Kheer thickens more as it cools
These tips help ensure a smooth, restaurant-quality kheer recipe every time.
Common Mistakes to Avoid
Cooking on high heat
Adding sugar too early
Using low-fat milk
Leaving the pot unattended
Overcooking until the rice breaks down completely
Avoiding these mistakes preserves both texture and flavor.
How to Serve Kheer
Kheer can be enjoyed:
Warm during colder months
Chilled in summer
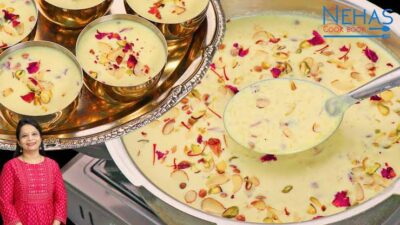
Garnished with nuts or rose petals
Served as a dessert or festive offering
Its versatility makes it suitable for both casual dinners and special occasions.
Storage and Shelf Life
H2: How to Store Kheer
Refrigerate in an airtight container
Keeps well for up to 3 days
Reheat gently with a splash of milk if needed
This makes kheer ideal for make-ahead desserts.
Why Kheer Remains a Timeless Dessert
In a world of complex desserts, kheer continues to shine because it’s comforting, adaptable, and rooted in tradition. The kheer recipe has crossed borders, appealing to home cooks and food lovers across North America who appreciate global flavors and simple cooking techniques.
It’s a dessert that tells a story with every spoonful.
Conclusion
If you’re searching for a dessert that combines simplicity, tradition, and rich flavor, the ultimate kheer recipe guide you need starts right here. With slow cooking, quality ingredients, and a bit of patience, you can create a creamy, aromatic kheer that rivals any restaurant version.
Whether you stick to the classic rice kheer or explore modern variations, this timeless dessert promises comfort, celebration, and unforgettable taste—every single time. 🍚✨