If you’ve ever admired a beautifully decorated cake with a smooth, flawless finish and wondered how to achieve it yourself — the secret is fondant! Making your own fondant might sound intimidating, but it’s surprisingly simple and budget-friendly. With this homemade fondant recipe in minutes, you’ll have soft, pliable, bakery-quality fondant ready to roll, shape, or color in no time.
Whether you’re a beginner baker or a decorating pro, this quick recipe will help you create stunning cakes and cupcakes that taste as amazing as they look. 🎂✨
🎀 What Is Fondant?
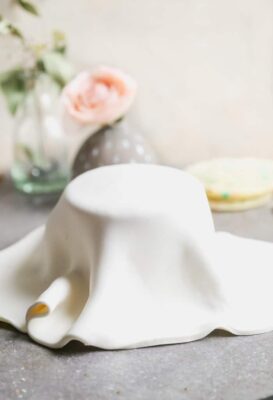
Fondant is a type of icing used to cover cakes, cupcakes, and cookies for a professional, smooth appearance. It’s sweet, stretchy, and easy to mold into any shape.
There are two main types:
Rolled fondant: Used for covering cakes and cutting out shapes.
Poured fondant: A thinner version used for drizzling or glazing pastries.
In this guide, we’ll focus on rolled fondant — the kind that gives cakes that picture-perfect finish.
🧁 Why Make Fondant at Home?
Store-bought fondant is convenient, but homemade fondant has unbeatable taste and texture. Here’s why you’ll love this recipe:
✅ Only 4 ingredients — no complicated steps!
✅ Ready in under 10 minutes
✅ Soft, smooth, and flexible
✅ Cheaper than store-bought fondant
✅ Tastes better — no chemical aftertaste
So if you’ve ever dreamed of decorating cakes like a pro, this homemade fondant recipe in minutes is your new best friend!
🍬 Ingredients You’ll Need
To make about 2 pounds (900 g) of fondant — enough to cover an 8-inch cake — you’ll need:
1 (16 oz / 450 g) bag mini marshmallows
4–5 cups powdered sugar, sifted
2 tablespoons water
1 tablespoon vegetable shortening (plus extra for kneading)
Optional:
Gel food coloring
½ teaspoon vanilla extract or almond extract for flavor
That’s it! Just a handful of pantry staples, and you’ll be rolling fondant like a pastry chef.
🥣 Step-by-Step: Homemade Fondant Recipe in Minutes
Step 1: Melt the Marshmallows
Place the mini marshmallows and water in a large microwave-safe bowl. Microwave in 30-second intervals, stirring after each one, until melted and smooth (usually 1–2 minutes total).
💡 Tip: Add flavoring extract at this stage if you’d like.
Step 2: Add Sugar Gradually
Add 3 cups of sifted powdered sugar to the melted marshmallows. Mix with a sturdy spoon or spatula until combined — it will get sticky and thick!
Step 3: Knead the Fondant
Grease your hands and a clean surface with shortening. Turn the fondant mixture out onto the surface and begin kneading, gradually adding the remaining sugar until it forms a soft, non-sticky dough.
If it’s too sticky, add more sugar a little at a time. If it’s too dry, add a few drops of water or a bit of shortening.
👐 The dough should feel like soft clay — pliable but not sticky.
Step 4: Wrap and Rest
Once smooth, form the fondant into a ball and coat it lightly with shortening. Wrap tightly in plastic wrap and let it rest at room temperature for 30 minutes before using.
This allows the sugar to settle and gives the fondant a perfect texture for rolling.
🎨 How to Use Homemade Fondant
Now comes the fun part — decorating!
Dust your surface with cornstarch or powdered sugar to prevent sticking.
Roll out the fondant with a non-stick rolling pin to about ⅛-inch thickness.
Lift carefully (using a rolling pin or your hands) and drape it over your frosted cake.
Smooth gently with a fondant smoother or your palms to remove air bubbles.
Trim the edges neatly at the base.
You can also cut out shapes using cookie cutters or mold flowers, bows, and other decorations.
🌈 Want color? Add gel food coloring during the kneading step — just a few drops go a long way!
💡 Pro Tips for Perfect Fondant
If you want your homemade fondant recipe in minutes to turn out bakery-perfect every time, try these expert tricks:
✅ 1. Use Fresh Marshmallows
Old or dry marshmallows won’t melt evenly and can make fondant grainy.
✅ 2. Don’t Overheat
Melt marshmallows slowly in the microwave — overheating makes them stiff.
✅ 3. Use Gel Food Coloring
Liquid colors can make fondant sticky. Gel or paste colors blend beautifully without affecting texture.
✅ 4. Store Properly
Wrap unused fondant tightly in plastic wrap, then place it in an airtight bag or container. It keeps for up to 2 months at room temperature or 6 months in the fridge.
✅ 5. Revive Dry Fondant
If fondant gets too firm, microwave it for 5 seconds or knead in a bit of shortening until soft again.
🍰 Flavor Variations You’ll Love
Homemade fondant doesn’t have to taste plain! Here are some delicious twists:
Vanilla Fondant: Add 1 teaspoon pure vanilla extract.
Almond Fondant: Use almond extract for a rich, nutty flavor.
Chocolate Fondant: Mix in ¼ cup cocoa powder for a chocolatey version.
Citrus Fondant: Add orange or lemon extract for a fresh zing.
These variations make your cake not just beautiful — but delicious too!
🎂 Decorating Ideas for Homemade Fondant
Now that you’ve mastered the basics, get creative!
Cover birthday or wedding cakes with elegant fondant drapes.
Cut out flowers, hearts, or stars to decorate cupcakes.
Mold fondant into figures for themed cakes (animals, baby showers, etc.).
Layer multiple colors for a stunning ombre effect.
Fondant turns every cake into a showpiece — and now you can do it at home! 🌟
🌸 Troubleshooting Common Fondant Issues
Even the best bakers run into hiccups sometimes. Here’s how to fix them:
Problem Cause Fix
Fondant cracks Too dry Add a few drops of water or knead in shortening
Fondant sticks Too wet or humid Dust with powdered sugar or cornstarch
Air bubbles Air trapped under surface Use a pin to gently pop and smooth
Fondant tears Rolled too thin Re-roll thicker and handle gently
With practice, you’ll quickly learn how to perfect your fondant’s texture and finish.
🍭 Why You’ll Love This Homemade Fondant Recipe
There’s something so satisfying about making your own fondant from scratch. You control the ingredients, avoid unnecessary additives, and get to enjoy a sweet treat that’s soft, smooth, and absolutely delicious.
This homemade fondant recipe in minutes isn’t just easy — it’s fun! Perfect for birthdays, holidays, or any celebration that deserves a cake with a professional touch.
🌟 Conclusion: Sweet Success Awaits!
You don’t need to be a pastry chef to create cakes that look (and taste) amazing. With this homemade fondant recipe in minutes, you’ll impress family and friends with your creativity and skill.
So grab your marshmallows, roll up your sleeves, and get ready to turn your next dessert into a masterpiece. Because when you make fondant yourself, every cake becomes a canvas for edible art! 🎨🍰