Brownies are one of the most forgiving bakes out there. That’s what makes an Easy brownie recipe for busy days! such a lifesaver:
Minimal dishes: One bowl, one pan, done.
No mixer needed: A whisk or spoon is enough.
Flexible timing: They don’t require precise decorating or layering.
Crowd-pleasing: Great for school events, office treats, or just a Netflix night.
Unlike layer cakes or delicate cookies, brownies can handle a bit of improvising. As long as you follow a few basics, you’ll get a rich, chocolatey square every time.
Essential Ingredients for an Easy Brownie Recipe
This Easy brownie recipe for busy days! uses pantry staples you can find easily in North American and UK supermarkets.
H2: Core Ingredients (for a 20cm / 8-inch square pan)
1/2 cup (115 g) unsalted butter
1 cup (200 g) granulated sugar
2 large eggs
2 teaspoons vanilla extract
1/3 cup (35 g) unsweetened cocoa powder
1/2 cup (65 g) all-purpose flour / plain flour
1/4 teaspoon salt
1/4 teaspoon baking powder (optional, for slightly less dense brownies)
H2: Optional Add-Ins
Use these to customize your Easy brownie recipe for busy days!:
1/2 cup (90 g) chocolate chips or chunks
1/3 cup (40 g) chopped nuts (walnuts, pecans, hazelnuts)
A small handful of mini marshmallows
1–2 tablespoons espresso powder (for deeper chocolate flavour)
Step-by-Step: Easy Brownie Recipe for Busy Days!
This is a simple, one-bowl method that works in both °F and °C, perfect for bakers in the US, UK, and Canada.
H2: Step 1 – Prepare Your Pan and Oven
Preheat your oven to 350°F / 175°C.
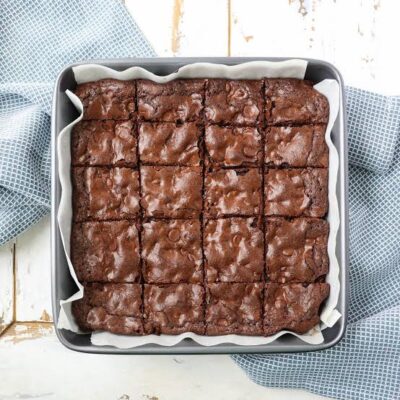
Line an 8-inch (20 cm) square pan with baking parchment / baking paper or lightly grease it.
Leave a bit of parchment overhanging the edges to lift the brownies out easily later.
Taking a minute to prep your pan makes your Easy brownie recipe for busy days! cleaner and faster to serve.
H2: Step 2 – Melt the Butter
In a microwave-safe bowl, add the butter.
Microwave in 15–20 second bursts until just melted, or melt it gently in a saucepan on the stove and then pour it into a mixing bowl.
Let it cool for a minute so it’s warm, not scorching hot.
Warm butter helps the sugar dissolve slightly, giving you that glossy, crackly top brownies are famous for.
H2: Step 3 – Mix in Sugar, Eggs, and Vanilla
Add the sugar to the warm butter and whisk until combined.
Add the eggs one at a time, whisking well after each addition.
Stir in the vanilla extract.
Whisking the eggs well adds a bit of air and helps create a shiny top while keeping the inside fudgy.
H2: Step 4 – Add Dry Ingredients
Sift or sprinkle in the cocoa powder, flour, salt, and baking powder (if using).
Gently fold or stir the dry ingredients into the wet mixture until just combined.
Don’t overmix—stop when you no longer see dry flour pockets.
At this point, the batter will be thick and glossy. This is the heart of your Easy brownie recipe for busy days!.
H2: Step 5 – Add Mix-Ins and Bake
Fold in any chocolate chips or nuts, if using.
Scrape the batter into your prepared pan and smooth the top.
Bake for 18–25 minutes, depending on your oven and how fudgy you like your brownies:
For fudgier brownies: start checking at 18 minutes.
For more set, slightly cakier brownies: 22–25 minutes.
To test:
Insert a toothpick or skewer near the center:
A few moist crumbs are perfect.
Wet batter means it needs more time.
Completely dry crumbs mean they’re more on the cakey side.
Let the brownies cool in the pan for at least 20–30 minutes before slicing.
Cooling helps them set and makes slicing much easier, even when you’re impatient on a busy day.
Quick Variations for Different Tastes
Once you’ve mastered this Easy brownie recipe for busy days!, you can switch things up without adding much time.
H2: Extra Fudgy Brownies
Use 3/4 cup (150 g) sugar + 1/4 cup (50 g) brown sugar for moistness.
Skip the baking powder for a denser texture.
Reduce baking time slightly and let them cool fully before cutting.
H2: One-Bowl Mocha Brownies
Add 1–2 teaspoons instant coffee or espresso powder to the dry ingredients.
Coffee intensifies the chocolate flavour without making them taste like coffee cake.
H2: Peanut Butter Swirl Brownies
Drop small spoonfuls of peanut butter on top of the batter.
Use a knife to gently swirl it through in figure-eights.
Bake as usual for a rich, marbled look.
H2: Mint Chocolate Brownies
Add 1/2 teaspoon peppermint extract to the batter (reduce vanilla slightly).
Top cooled brownies with a thin layer of mint icing or sprinkle crushed mint chocolates on top right after baking.
These simple variations keep your Easy brownie recipe for busy days! feeling fresh without needing new recipes every time.
Practical Tips for Perfect Brownies Every Time
Here’s your brownie cheat sheet—especially helpful when you’re tired, hungry, and don’t want any drama in the kitchen.
H2: Use the Right Pan Size
This recipe is designed for an 8-inch (20 cm) square pan.
If you use a larger pan (like 9×13 inch), the brownies will be thinner and bake faster—start checking early.
H2: Don’t Overbake
The most common mistake is baking brownies until the toothpick comes out completely clean. For fudgy brownies, you actually want:
Moist crumbs on the toothpick, not dry.
Slight jiggle is okay as long as the edges are set.
Remember: they continue to set as they cool.
H2: Measure Flour Lightly
If you’re using cups:
Spoon the flour into the cup and level it off with a knife instead of scooping straight from the bag (which packs it in and leads to dry brownies).
If you prefer grams, use 65 g flour for best texture.
H2: Line the Pan for Faster Cleanup
Lining the pan with parchment and leaving a little overhang means:
Easy lift-out
Less scrubbing
Neater edges—a bonus if you’re bringing brownies to school, work, or a party
Perfect for an Easy brownie recipe for busy days! when you don’t want a sink full of dishes.
H2: Let Them Cool (At Least a Little!)
We get it—warm brownies are amazing. But slicing too soon can make them crumble:
For neat squares, cool completely and use a sharp knife.
For gooey, warm servings, cool about 15–20 minutes and cut gently; expect softer edges.
H2: Storage and Make-Ahead Tips
Store brownies in an airtight container at room temperature for 3–4 days.
For longer storage, wrap tightly and freeze up to 2–3 months.
You can also make the batter, pour it into the pan, and chill it in the fridge for a few hours before baking; this can deepen the flavour and keep you flexible with timing.
Conclusion
A homemade pan of brownies doesn’t have to be a weekend-only project. With this Easy brownie recipe for busy days!, you can:
Go from craving to cooling rack in under an hour
Use basic ingredients you probably already have
Customize with simple add-ins for different moods and occasions
Whether you’re in a tiny flat kitchen in the UK, a dorm in Canada, or a busy family home in the US, this one-bowl brownie method gives you a reliable, chocolatey treat whenever you need a quick dessert, lunchbox extra, or “I survived today” reward.