If you’re into rich chocolate, creamy ice cream, crunchy peanuts, and that irresistible fudge topping, Buster Bar Ice Cream Cake is basically dessert heaven. Inspired by the famous Dairy Queen treat, this no-bake frozen cake is surprisingly easy to make at home — and it’s a guaranteed crowd-pleaser for birthdays, summer parties, or anytime you want a seriously indulgent sweet.
Let’s walk through everything you need to know — from ingredients and layering tips to smart variations and storage tricks — so your homemade version turns out just as good (maybe better 😉) than the classic.
🧁 What Is a Buster Bar Ice Cream Cake?
A Buster Bar Ice Cream Cake is a layered frozen dessert typically made with:
Vanilla or chocolate ice cream
Chocolate fudge sauce
Crunchy peanuts
Chocolate cookie or crumb crust
A whipped topping or chocolate shell layer
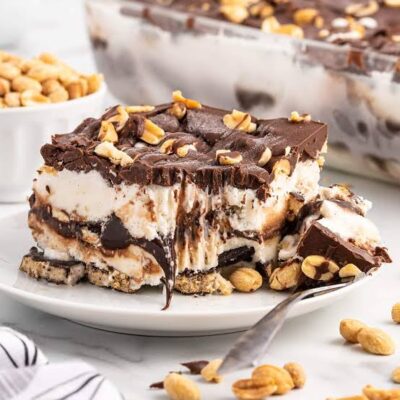
The signature feature is the thick layer of fudge and peanuts in the center, creating a contrast between creamy and crunchy textures. It’s rich, nostalgic, and surprisingly simple to assemble since it requires no baking.
🛒 Ingredients You’ll Need
Here’s a classic homemade ingredient list that works beautifully:
Base Layer
2–3 cups crushed chocolate sandwich cookies or chocolate wafer crumbs
4 tablespoons melted butter
Ice Cream Layers
1.5–2 liters vanilla ice cream (softened slightly)
Optional: chocolate or peanut butter ice cream for variation
Signature Middle Layer
1 cup salted roasted peanuts
1½ cups thick hot fudge sauce
Top Layer
1 tub whipped topping (or homemade stabilized whipped cream)
Optional chocolate syrup or shaved chocolate for garnish
👩🍳 Step-by-Step Instructions
1️⃣ Prepare the Crust
Mix the crushed cookies with melted butter until the texture resembles wet sand. Press the mixture firmly into the bottom of a lined springform pan or rectangular dish. Freeze for 15–20 minutes to firm up.
2️⃣ Add the First Ice Cream Layer
Spread half of the softened ice cream evenly over the chilled crust. Smooth the surface using a spatula and freeze for about 30 minutes until firm.
3️⃣ Create the Fudge & Peanut Center
Warm the fudge slightly so it spreads easily (but don’t make it hot). Pour it over the frozen ice cream layer and sprinkle peanuts generously on top. Freeze again for 20–30 minutes to set.
4️⃣ Add the Second Ice Cream Layer
Spread the remaining ice cream over the fudge and peanut layer. Smooth the top and freeze for at least 2 hours until fully solid.
5️⃣ Finish With Topping
Spread whipped topping evenly over the cake. Add chocolate drizzle, crushed cookies, or extra peanuts for decoration. Freeze for several hours or overnight before serving.
💡 Tips for Perfect Results
Use Slightly Softened Ice Cream
Let the ice cream sit at room temperature for about 10–15 minutes before layering. This makes spreading much easier and prevents tearing the lower layers.
Freeze Between Layers
Freezing each layer helps keep the dessert structured and prevents the fudge from sinking into the ice cream.
Line the Pan
Use parchment paper or plastic wrap for easy removal. Springform pans are especially helpful for clean presentation.
Choose Thick Fudge Sauce
Thin chocolate syrup can become icy or runny. A dense hot fudge topping keeps the classic Buster Bar texture.
🔄 Flavor Variations to Try
Peanut Butter Lover’s Version
Replace vanilla ice cream with peanut butter ice cream
Add a drizzle of melted peanut butter between layers
Cookies & Cream Twist
Use cookies-and-cream ice cream
Add extra crushed cookies into the fudge layer
Salted Caramel Buster Cake
Swap chocolate fudge for thick caramel sauce
Sprinkle flaky sea salt over the topping
Nut-Free Option
Replace peanuts with crushed pretzels or chocolate chips for crunch
🍽️ Serving Suggestions
Let the cake sit at room temperature for 5–10 minutes before slicing.
Use a warm knife for clean cuts.
Serve with hot fudge drizzle or fresh berries to balance the richness.
This dessert is extremely rich, so smaller slices usually go a long way — though people will definitely come back for seconds 😄.
🧊 Storage & Make-Ahead Tips
Store covered in the freezer for up to 1 week for best texture.
Wrap tightly to prevent freezer burn.
You can assemble the cake several days ahead of an event, making it a perfect stress-free party dessert.
🌟 Why People Love Buster Bar Ice Cream Cake
No oven required
Easy to customize
Perfect make-ahead dessert
A nostalgic favorite with modern variations
Combines creamy, crunchy, and chocolatey textures in every bite
It’s one of those desserts that looks impressive but requires minimal technical skill — which is probably why it’s such a popular homemade treat across North America and beyond.
🍰 Final Thoughts
Buster Bar Ice Cream Cake is a fun, indulgent dessert that brings together classic ice cream shop flavors in a homemade format. With simple ingredients, flexible layering options, and no baking required, it’s an ideal recipe for beginners and experienced home cooks alike. Whether you’re planning a birthday party, summer barbecue, or just craving a frozen chocolate-peanut treat, this cake delivers maximum flavor with minimal effort.