Bright, silky, and bursting with fresh citrus flavor, lemon curd is one of those recipes that feels fancy but is surprisingly simple when you know the right technique. Whether you’re spreading it on toast, swirling it into yogurt, or using it as a cake filling, nothing beats a homemade batch done right. If you’ve ever ended up with curd that’s too runny, too eggy, or overly sharp, don’t worry—you’re about to learn the secrets. Follow this guide for the perfect lemon curd recipe every time – here’s how!
Beloved in the United States, the United Kingdom, and Canada, lemon curd is a classic that appears everywhere from afternoon teas to modern desserts. This article walks you through ingredients, step-by-step instructions, troubleshooting, and expert tips so your lemon curd turns out smooth, glossy, and perfectly balanced—every single time.
Why Lemon Curd Is a Timeless Favorite
H2: The Perfect Balance of Sweet and Tart
Lemon curd stands out because it hits that magical balance: tangy enough to taste fresh and bright, but sweet and creamy enough to feel indulgent.
H2: Incredibly Versatile
Lemon curd can be used in countless ways:
Spread on toast, scones, or biscuits
Filled into cakes, tarts, and cupcakes
Swirled into cheesecake or mousse
Served with pancakes, waffles, or yogurt
That versatility is why so many home cooks want the perfect lemon curd recipe every time – here’s how!
H2: Simple Ingredients, Big Flavor
You only need a handful of ingredients, but technique makes all the difference.
Essential Ingredients for Perfect Lemon Curd
H2: Core Ingredients
Fresh lemons (juice and zest)
Granulated sugar
Eggs (or egg yolks)
Unsalted butter
That’s it—no cream, no flour, no shortcuts.
H2: Why Fresh Lemons Matter
Bottled lemon juice lacks the brightness and aroma that fresh lemons provide. The zest, in particular, contains essential oils that give lemon curd its signature flavor.
Pro tip: Choose lemons that feel heavy for their size—they’re juicier.
The Real Secret to Perfect Lemon Curd
H2: Gentle Heat and Constant Whisking
The number one secret is control. Lemon curd should never boil. Gentle heat and steady whisking prevent curdling and ensure a smooth, velvety texture.
H2: Temperature Awareness
Lemon curd thickens at around 170–175°F (77–80°C). Above this, eggs scramble. Below it, the curd won’t set.
This temperature control is the foundation of the perfect lemon curd recipe every time – here’s how!
Step-by-Step: Perfect Lemon Curd Recipe
H2: Ingredients
¾ cup (150 g) granulated sugar
Zest of 2 lemons
½ cup (120 ml) fresh lemon juice
3 large eggs (or 4 yolks for extra richness)
½ cup (115 g) unsalted butter, cubed
H2: Instructions
H3: Step 1 – Infuse the Sugar
In a bowl, rub the lemon zest into the sugar using your fingers. This releases the oils and boosts lemon flavor.
H3: Step 2 – Whisk the Base
Whisk sugar, lemon juice, and eggs until smooth. Make sure the mixture is fully combined before heating.
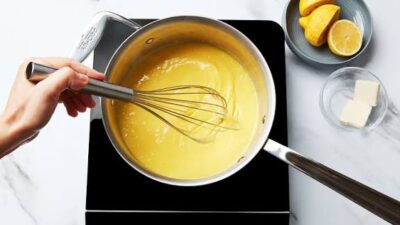
H3: Step 3 – Cook Gently
Pour the mixture into a saucepan and cook over low to medium-low heat, whisking constantly. Be patient—this takes 8–12 minutes.
The mixture will slowly thicken to coat the back of a spoon.
H3: Step 4 – Add Butter
Remove from heat and whisk in butter cubes one at a time until fully melted and glossy.
H3: Step 5 – Strain (Optional but Recommended)
Strain through a fine-mesh sieve to remove zest or any tiny egg bits for ultra-smooth curd.
Let cool slightly, then transfer to jars.
That’s it—you’ve achieved the perfect lemon curd recipe every time – here’s how!
How to Know When Lemon Curd Is Done
H2: Visual and Texture Cues
Thick enough to coat a spoon
Leaves a clear line when you run your finger through it
Looks glossy, not watery
H2: Cooling Sets the Curd
Lemon curd thickens more as it cools, so don’t overcook it trying to reach final thickness on the stove.
Common Lemon Curd Mistakes (and Fixes)
H2: Curdled or Scrambled Texture
Cause: Heat too high
Fix: Remove from heat immediately and blend with an immersion blender, then strain.
H2: Too Runny
Cause: Undercooked
Fix: Return to low heat and cook gently until thickened.
H2: Too Sour
Cause: Too much juice or not enough sugar
Fix: Whisk in a little powdered sugar after cooking.
Avoiding these mistakes ensures success every time.
Variations on Classic Lemon Curd
H2: Extra Creamy Lemon Curd
Use all egg yolks instead of whole eggs for a richer texture.
H2: Meyer Lemon Curd
Sweeter and less acidic—perfect for those who prefer mild citrus flavor.
H2: Lime or Orange Curd
Swap lemons for limes or oranges using the same method.
The technique remains the same, proving how versatile this recipe is.
Practical Tips for Guaranteed Success
Always use low heat
Whisk constantly, especially around the edges
Cut butter into small cubes for easy melting
Use a heavy-bottomed saucepan
Taste and adjust sweetness at the end
These small details are what make the perfect lemon curd recipe every time – here’s how! truly reliable.
How to Use Lemon Curd
Lemon curd shines in both simple and elegant dishes:
Layered in cakes and trifles
Spooned into tart shells
Served with scones and clotted cream
Swirled into whipped cream or mascarpone
It instantly elevates even the simplest dessert.
Storage and Shelf Life
H2: Refrigeration
Store in airtight jars
Keeps for up to 2 weeks in the fridge
H2: Freezing
Freeze up to 3 months
Thaw overnight in the refrigerator
Lemon curd freezes surprisingly well without losing texture.
Why This Recipe Works Across Regions
From home bakers in the US to tea lovers in the UK and dessert enthusiasts in Canada, this method works because it’s based on technique—not guesswork. Once you understand heat control and balance, success is guaranteed. That’s why so many cooks swear by the perfect lemon curd recipe every time – here’s how!
Conclusion
Lemon curd doesn’t have to be intimidating. With fresh ingredients, gentle heat, and a little patience, you can create a smooth, vibrant spread that rivals any bakery version. By following this guide, you’ll achieve the perfect lemon curd recipe every time – here’s how!—silky, balanced, and irresistibly lemony.
Once you master it, you’ll find endless ways to use it, share it, and show it off 🍋✨