Soft, fluffy, and wholesome, idlis are a classic South Indian breakfast that everyone loves. These steamed rice cakes are not only light and delicious but also surprisingly healthy. And the best part? You won’t believe how easy this idli recipe is! Even if you’ve never made idlis before, you can achieve the perfect texture and taste with a few simple steps.
Idlis have gained popularity worldwide, from the United States to the United Kingdom and Canada, because they’re nutritious, versatile, and perfect for busy mornings or meal prep. With this guide, you’ll learn a foolproof method to make soft, fluffy idlis every time.
Why Idlis Are So Popular
Healthy and Digestible
Made from fermented rice and urad dal (split black gram), idlis are low in fat, high in protein, and easy to digest. Fermentation also boosts nutrient availability, making idlis a wholesome start to your day.
Perfect for Any Meal
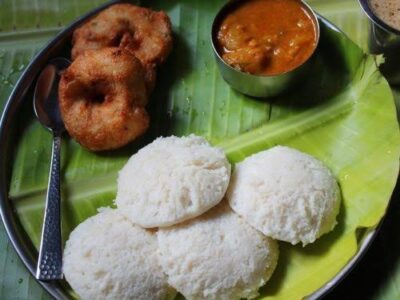
While traditionally eaten for breakfast, idlis are versatile enough for lunch, dinner, or even snacks. Pair them with sambar, coconut chutney, or even spicy curries for a satisfying meal.
Simple Ingredients, Big Flavor
The combination of rice, lentils, and fermentation results in a subtly tangy flavor that pairs beautifully with a variety of condiments. This simplicity explains why you won’t believe how easy this idli recipe is!
Ingredients You’ll Need
2 cups parboiled rice (idli rice works best)
1 cup urad dal (split black gram)
1 teaspoon fenugreek seeds (optional, for fermentation)
Salt to taste
Water (for soaking and grinding)
Optional: a little oil for greasing the idli molds
Step-by-Step Guide to Perfect Idlis
Step 1: Soak the Rice and Dal
Rinse the rice and urad dal separately.
Soak the rice in water for 4–6 hours.
Soak the urad dal and fenugreek seeds in water for 4–6 hours.
Soaking is key to soft, fluffy idlis and is one reason you won’t believe how easy this idli recipe is!
Step 2: Grind the Batter
Drain the soaked dal and rice.
Grind the urad dal into a smooth, fluffy batter using minimal water.
Grind the rice into a slightly coarse batter.
Mix both batters in a large bowl, ensuring a uniform consistency.
Step 3: Ferment the Batter
Cover the batter and leave it in a warm place for 8–12 hours (overnight works best).
The batter should double in volume and become slightly bubbly.
Fermentation is what gives idlis their soft texture and subtle tang.
Step 4: Add Salt and Prepare Steamer
Once fermented, add salt and mix gently.
Grease idli molds lightly with oil.
Pour the batter into molds, filling about 3/4 full.
Step 5: Steam the Idlis
Boil water in an idli steamer or large pot.
Place the idli molds on the steamer rack and cover.
Steam for 10–15 minutes until a toothpick inserted comes out clean.
Step 6: Serve Fresh
Use a spoon to gently remove idlis from the molds.
Serve hot with coconut chutney, sambar, or any chutney of your choice.
Tips for Making Fluffy Idlis
Keep the Batter Warm
A slightly warm environment helps fermentation. During cold weather, place the batter in an oven with the light on or near a warm spot.
Don’t Overmix After Fermentation
Mix gently to maintain air bubbles that make idlis soft and fluffy.
Grease the Molds Lightly
A tiny bit of oil ensures idlis don’t stick but keeps the surface soft.
Steam, Don’t Boil
Steam gently to maintain the spongy texture. Avoid opening the lid too frequently during cooking.
Optional Variations
Rava Idli: Made with semolina instead of rice
Vegetable Idli: Add grated carrots, peas, or bell peppers
Mini Idlis: Serve with sambar or as a kid-friendly snack
Flavored Idli: Mix in herbs or spices like curry leaves, cumin, or green chilies
These creative options show why you won’t believe how easy this idli recipe is! while keeping it fun and versatile.
Storage Tips
Leftover idlis can be refrigerated for up to 2 days.
Reheat by steaming for a few minutes to restore softness.
Idli batter can also be stored in the fridge for 1–2 days for quick steaming.
Why This Recipe Works Globally
Simple ingredients available in most countries
Minimal equipment required (steamer or pot with lid)
Versatile and customizable for different tastes
Healthy, light, and easy to digest
This makes it perfect for students, families, and busy professionals in the US, UK, and Canada.
Conclusion
Making idlis at home doesn’t have to be intimidating. With a little soaking, grinding, and steaming, you can enjoy soft, fluffy idlis anytime. This recipe proves that you won’t believe how easy this idli recipe is!
Whether paired with chutney, sambar, or a spicy curry, homemade idlis bring warmth, nutrition, and comfort to your table. Start with this guide and enjoy the timeless delight of South Indian cuisine in your own kitchen. 🥣✨