Few things elevate desserts as effortlessly as a perfectly made ganache. Silky, glossy, and rich, ganache is the foundation of countless classic and modern desserts—from elegant chocolate cakes to truffles and tarts. Whether you’re a home baker or an aspiring pastry enthusiast, learning how to master the art of ganache recipe today! will instantly upgrade your dessert skills.
Ganache may sound sophisticated, but it’s surprisingly simple. With just a few ingredients and the right technique, you can create a luxurious chocolate mixture that adapts to countless uses. In this guide, you’ll discover how ganache works, the best ingredient ratios, common variations, and expert tips to achieve flawless results every time.
What Is Ganache?
Ganache is a smooth blend of chocolate and warm cream. When combined correctly, these two ingredients emulsify into a rich, velvety mixture that can be poured, whipped, or set firm depending on the ratio used.
The magic of ganache lies in its versatility. Once you master the art of ganache recipe today!, you can use it as:
A cake glaze or drip
A frosting or filling
A truffle center
A sauce for desserts
A base for mousse or tarts
H2: Understanding Ganache Ratios
The key to perfect ganache is the chocolate-to-cream ratio. Different ratios produce different textures.
H3: Pourable Ganache (1:1 Ratio)
Best for glazing cakes and pouring over desserts
Smooth, shiny finish
Sets softly at room temperature
H3: Firm Ganache (2:1 Ratio)
Ideal for truffles and sculpting
Holds its shape well
Can be rolled or cut cleanly
H3: Whipped Ganache (1:2 Ratio)
Light, airy texture
Perfect for frosting cupcakes or filling pastries
Whips beautifully once cooled
Knowing these ratios is essential if you want to truly master the art of ganache recipe today!
H2: Essential Ingredients for Perfect Ganache
H3: Chocolate Matters
Choose high-quality chocolate with at least 50–70% cocoa for the best flavor and texture. Chocolate chips often contain stabilizers, so real chocolate bars or couverture chocolate are preferred.
H3: Cream Selection
Use heavy cream (also called whipping cream) with at least 35% fat. The fat content ensures proper emulsification and smoothness.
Optional Flavor Enhancers
Vanilla extract
Espresso powder
Orange zest
Liqueurs or spirits
Butter for extra shine
H2: Step-by-Step Ganache Recipe
H3: Preparation
Finely chop the chocolate and place it in a heatproof bowl.
Heat the cream in a saucepan until just simmering—do not boil.
H3: Making the Ganache
Pour the hot cream over the chopped chocolate.
Let it sit undisturbed for 2–3 minutes.
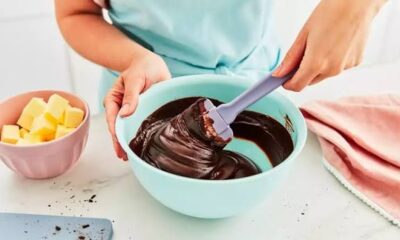
Gently stir from the center outward until smooth and glossy.
H3: Cooling and Using
Use immediately for pouring or glazing
Allow to cool and thicken for frosting or truffles
Chill and whip if making whipped ganache
By following these steps, you’ll quickly master the art of ganache recipe today! with professional-quality results.
H2: White, Milk, and Dark Chocolate Ganache
H3: Dark Chocolate Ganache
Rich and intense, perfect for elegant desserts and bold flavors.
H3: Milk Chocolate Ganache
Sweeter and creamier, ideal for fillings and kid-friendly treats.
H3: White Chocolate Ganache
Delicate and sweet, pairs beautifully with berries and citrus flavors. Use less cream, as white chocolate is softer.
Each type requires slight ratio adjustments, but the method remains the same.
H2: Common Ganache Mistakes and How to Fix Them
H3: Ganache Is Grainy
Cause: Overheating or stirring too aggressively.
Fix: Add a small amount of warm cream and gently whisk.
H3: Ganache Is Too Thin
Cause: Too much cream or warm temperature.
Fix: Let it cool or add more melted chocolate.
H3: Ganache Is Too Thick
Cause: Too much chocolate or cold temperature.
Fix: Warm gently over a water bath.
Avoiding these mistakes helps you truly master the art of ganache recipe today!
H2: Creative Ways to Use Ganache
Drip cakes and mirror-glazed desserts
Chocolate truffles and bonbons
Tart fillings and layered cakes
Swirls in brownies or cheesecakes
Hot chocolate base
Ganache adapts to both casual and luxury desserts with ease.
Practical Tips for Professional Results
Always chop chocolate finely for even melting
Stir slowly to avoid air bubbles
Use a spatula instead of a whisk for smoother texture
Cover ganache with plastic wrap touching the surface while cooling
Allow ganache to rest before using for best consistency
These tips will help you master the art of ganache recipe today! with confidence.
Storage and Shelf Life
Store ganache in the refrigerator for up to 5 days
Freeze for up to 2 months in an airtight container
Bring to room temperature before reusing
Conclusion
Ganache is one of the most powerful tools in any baker’s repertoire. Simple yet luxurious, it transforms ordinary desserts into showstoppers. Once you understand ratios, techniques, and variations, you’ll find endless ways to incorporate it into your baking.
With this guide, you’re fully equipped to master the art of ganache recipe today! From silky glazes to whipped frostings and decadent truffles, ganache opens the door to professional-quality desserts made right in your own kitchen. Enjoy the process—and every rich, chocolatey bite.