Challah bread is famous for its beautiful braided shape, soft texture, and slightly sweet flavor—but many home bakers assume it’s difficult or time-consuming to make. The truth? Once you understand the basics, challah is one of the most rewarding and surprisingly simple breads you can bake at home.
In this guide, you won’t believe how easy this challah bread recipe is! We’ll walk you through everything step by step, from understanding what makes challah unique to shaping, baking, and troubleshooting. Whether you’re baking for a special occasion, a weekend family meal, or simply want to enjoy homemade bread in the United States, United Kingdom, or Canada, this article will give you the confidence to master challah with ease.
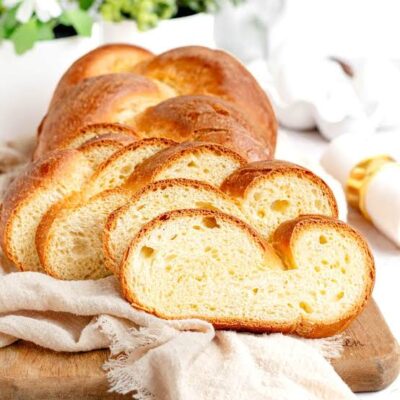
What Is Challah Bread?
Challah is a traditional Jewish bread, most commonly enjoyed on the Sabbath and holidays. It’s enriched with eggs and oil, giving it a tender crumb and golden color. Unlike brioche, challah is usually dairy-free, making it versatile for many meals.
Why Challah Bread Is So Loved (H3)
Soft, fluffy, and slightly sweet
Beautiful braided appearance
Perfect for sandwiches, toast, and French toast
Special yet approachable
Once you try making it yourself, you’ll understand why you won’t believe how easy this challah bread recipe is!
Ingredients You’ll Need
Simple Pantry Staples (H2)
This easy challah bread recipe uses ingredients you likely already have:
All-purpose flour or bread flour
Active dry yeast or instant yeast
Warm water
Sugar or honey
Eggs
Neutral oil (vegetable or canola)
Salt
That’s it—no complicated techniques or specialty tools required.
Optional Flavor Additions (H3)
To personalize your challah, you can add:
Extra honey for sweetness
Sesame or poppy seeds for topping
Raisins for a traditional variation
Step-by-Step: You Won’t Believe How Easy This Challah Bread Recipe Is!
Step 1: Activate the Yeast (H3)
In a large bowl, combine warm water, yeast, and sugar. Let it sit for 5–10 minutes until foamy. This step ensures your yeast is active and ready to work.
Step 2: Mix the Dough (H3)
Add eggs, oil, and salt to the yeast mixture. Gradually stir in flour until a soft dough forms.
Tip: The dough should be slightly tacky but not sticky.
Step 3: Knead Until Smooth (H3)
Knead the dough by hand or with a stand mixer for about 8–10 minutes, until smooth and elastic. Good kneading gives challah its signature soft texture.
Step 4: First Rise (H3)
Place the dough in a lightly oiled bowl, cover, and let it rise in a warm spot until doubled in size—about 1 to 1½ hours.
Already, you’ll see you won’t believe how easy this challah bread recipe is!
How to Shape Challah Like a Pro
Classic Three-Strand Braid (H2)
Divide the dough into three equal pieces
Roll each into a long rope
Pinch the tops together and braid
Tuck the ends underneath
This is the simplest and most popular shape for beginners.
Other Challah Shapes (H3)
Four- or six-strand braids
Round challah for holidays
Mini challah rolls
Don’t worry if your braid isn’t perfect—rustic is beautiful.
Second Rise and Egg Wash
Why the Second Rise Matters (H2)
After shaping, let the challah rise again for 30–45 minutes. This gives the bread a lighter, airier texture.
The Secret to a Golden Crust (H3)
Brush the dough gently with egg wash (beaten egg with a splash of water). This creates the glossy, deep-golden finish challah is known for.
Baking the Challah
Oven Temperature and Timing (H2)
Bake at 350°F (175°C) for 30–35 minutes, until:
The top is deep golden brown
The bread sounds hollow when tapped
If the top browns too quickly, tent loosely with foil.
What Makes Challah So Soft?
The Science Behind the Texture (H2)
Challah’s softness comes from:
Eggs, which add richness
Oil, which keeps the crumb tender
Proper kneading and rising
This balance explains why everyone is surprised—and delighted—by how easy this challah bread recipe is!
Common Mistakes to Avoid
Even simple bread can go wrong without a few precautions:
Using water that’s too hot – kills yeast
Adding too much flour – results in dry bread
Skipping the second rise – dense texture
Overbaking – dries out the loaf
Avoid these, and your challah will turn out bakery-worthy.
Practical Tips for Perfect Challah Every Time
Measure flour accurately
Knead until dough is smooth and elastic
Let the dough rise fully—don’t rush it
Use parchment paper for easy cleanup
Cool slightly before slicing
These tips guarantee success, even for first-time bakers.
Delicious Ways to Serve Challah
Challah is incredibly versatile:
Fresh with butter or honey
Toasted for breakfast
Sandwiches and sliders
French toast or bread pudding
Leftover challah often tastes even better the next day.
Can Challah Be Made Ahead?
Storage and Freezing Tips (H2)
Store at room temperature for up to 3 days
Freeze whole or sliced for up to 2 months
Thaw at room temperature and warm before serving
This makes challah perfect for planning ahead.
Why This Challah Recipe Is Beginner-Friendly
This recipe works because it:
Uses simple ingredients
Requires no special equipment
Has flexible timing
Produces consistent results
That’s exactly why you won’t believe how easy this challah bread recipe is!
Challah Bread Across Cultures
While rooted in Jewish tradition, challah has become popular across North America and the UK as a soft, enriched bread enjoyed by people of all backgrounds. Its universal appeal lies in its flavor, texture, and versatility.
Conclusion
Challah bread may look impressive, but it’s far more approachable than it appears. With basic ingredients, simple steps, and a little patience, anyone can bake a beautiful, soft, golden loaf at home.
Now that you know how straightforward the process truly is, it’s time to try it yourself. You won’t believe how easy this challah bread recipe is! Once you bake it once, it’s sure to become a cherished favorite in your kitchen—perfect for both everyday meals and special moments. 🍞✨