A Simple, Natural DIY You Can Make in Minutes
If you love soft, glowing skin but don’t want expensive store-bought products, you’re in for a treat. You truly won’t believe how easy this sugar scrub recipe is! With just a few simple ingredients—most of which you probably already have at home—you can create a luxurious body scrub that works wonders.
Perfect for readers in the United States, United Kingdom, and Canada, this recipe is beginner-friendly, budget-friendly, and completely customizable.
Why Sugar Scrubs Are So Popular (H2)
Sugar scrubs are loved because they:
Gently exfoliate dead skin cells
Leave skin smooth and glowing
Help moisturize dry skin
Are natural and chemical-free
That’s why so many people say, you won’t believe how easy this sugar scrub recipe is until they try it themselves!
The Basic Sugar Scrub Recipe (H2)
Simple Ingredients You Need (H3)
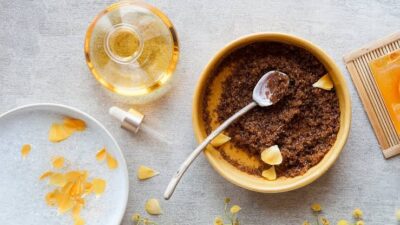
You only need 3 main ingredients:
1 cup sugar (white or brown)
½ cup oil (coconut, olive, almond, or jojoba)
Optional: 10–15 drops essential oil (lavender, lemon, vanilla, peppermint)
That’s it—seriously! You’ll quickly see why you won’t believe how easy this sugar scrub recipe is.
Step-by-Step Instructions (H3)
Add the sugar to a bowl
Slowly mix in the oil until it looks like wet sand
Stir in essential oils if using
Transfer to a clean jar with a lid
Your homemade sugar scrub is ready to use in under 5 minutes.
How to Use Your Sugar Scrub (H2)
For best results:
Use in the shower on damp skin
Massage gently in circular motions
Rinse with warm water
Pat skin dry (don’t rub)
Use 1–2 times per week for smooth, healthy skin.
Why Sugar Is Better Than Salt for Scrubs (H2)
Sugar is:
Gentler on sensitive skin
Naturally hydrating (it’s a humectant)
Less abrasive than salt
This makes sugar scrubs ideal for hands, legs, and even lips—another reason you won’t believe how easy this sugar scrub recipe is and how well it works.
Custom Sugar Scrub Variations You’ll Love (H2)
Brown Sugar & Honey Scrub (H3)
Extra gentle
Perfect for dry or sensitive skin
Lemon Sugar Scrub (H3)
Brightening and refreshing
Great for summer skincare
Vanilla Coconut Scrub (H3)
Smells like dessert
Super moisturizing
You can change the scent and texture anytime!
Practical Tips for Best Results (H2)
Use fine sugar for delicate areas
Store in a sealed container
Keep water out of the jar
Label your scrub with the date
👉 Shelf life: about 1–2 months (longer if stored properly)
Common Mistakes to Avoid (H2)
Scrubbing too hard
Using on broken or irritated skin
Letting water get into the container
Overusing (more is not better!)
Gentle and consistent use gives the best results.
Why Homemade Sugar Scrubs Are Better (H2)
People love DIY sugar scrubs because:
They’re cheaper than store brands
You control the ingredients
No harsh chemicals
Eco-friendly and customizable
It’s no surprise people keep saying you won’t believe how easy this sugar scrub recipe is once they try it.
Perfect for Gifts & Self-Care (H2)
Homemade sugar scrubs make wonderful:
Self-care treats
Holiday gifts
Birthday presents
Bridal shower favors
Just add a ribbon and a label!
Conclusion: Try It Today!
Now you see why you won’t believe how easy this sugar scrub recipe is! With minimal effort and maximum results, this DIY scrub is a must-try for anyone who loves simple, natural skincare.
Make a batch today, treat your skin, and enjoy that smooth, spa-like glow—right from home ✨💆♀️