Broccoli is a cool-season vegetable that’s packed with nutrients and surprisingly easy to grow when you know the basics. Many gardeners struggle with small heads or bolting plants, but with the right timing and care, you can master how to plant broccoli successfully and enjoy a bountiful harvest.
This guide breaks everything down into simple, proven steps.
Why Grow Broccoli at Home?
Rich in vitamins and antioxidants
Thrives in home gardens and containers
Produces multiple side shoots
Grows well in cool weather
Understanding broccoli’s needs is the key to success.
Choose the Right Time to Plant
Timing is critical for how to plant broccoli successfully.
Spring planting: Start seeds 6–8 weeks before the last frost
Fall planting: Start seeds 10–12 weeks before the first frost
Ideal growing temperature: 60–70°F (15–21°C)
Too much heat causes broccoli to bolt and flower early.
Pick the Best Location
Broccoli grows best in:
Full sun (at least 6 hours daily)
Fertile, well-draining soil
Areas protected from strong wind
Prepare the Soil Properly
Healthy soil makes a big difference.
Loosen soil 12–15 inches deep
Mix in compost or well-rotted manure
Soil pH should be 6.0–7.0
Rich soil encourages strong roots and large heads.
How to Plant Broccoli Step by Step
Step 1: Start Seeds Indoors or Direct Sow
Sow seeds ¼ inch deep
Space seeds 2 inches apart
Keep soil moist until germination (5–10 days)
Step 2: Transplant Seedlings
Transplant when seedlings have 4–5 true leaves
Space plants 18–24 inches apart
Plant deeply up to the first leaves
Step 3: Water Thoroughly
Water immediately after planting to settle roots.
Watering Broccoli the Right Way
Keep soil consistently moist
Water deeply 1–1.5 inches per week
Avoid wetting the leaves to prevent disease
Mulching helps retain moisture and cool the soil.
Feeding for Strong Growth
Broccoli is a heavy feeder.
Fertilize 2–3 weeks after planting
Use balanced fertilizer or compost tea
Avoid excess nitrogen late in growth
Simple Tricks for Bigger Broccoli Heads
Mulch to keep roots cool
Harvest main head early to encourage side shoots
Shade plants during hot afternoons
Remove yellowing leaves
Keep pests under control
These tricks are essential for how to plant broccoli successfully.
Common Broccoli Problems & Fixes
Small heads: Lack of nutrients or heat stress
Bolting: Planting too late in warm weather
Yellow leaves: Nitrogen deficiency
Pests: Use row covers for cabbage worms
Harvesting Broccoli
Harvest when heads are firm and tight
Cut the main head with 5–6 inches of stem
Side shoots will continue producing
Harvest early—buds should not open into flowers.
Growing Broccoli in Containers
Use containers at least 12 inches deep
One plant per pot
Ensure good drainage
Water more frequently than garden beds
Conclusion
Learning how to plant broccoli successfully is all about timing, soil preparation, and consistent care. With cool temperatures, rich soil, and these simple tricks, you can grow strong plants that reward you with fresh, delicious broccoli.
Start early, stay consistent, and enjoy homegrown harvests straight from your garden 🥦🌿
If you’d like, I can also help with:
Growing broccoli in hot climates
Organic pest control for broccoli
Best companion plants for broccoli
How to store fresh broccoli
Just tell me what you’d like next!
Easy veg pulao recipe for busy days!
Here’s a quick, flavorful, and no-fuss meal that’s perfect when time is short 🍚🥕🌿
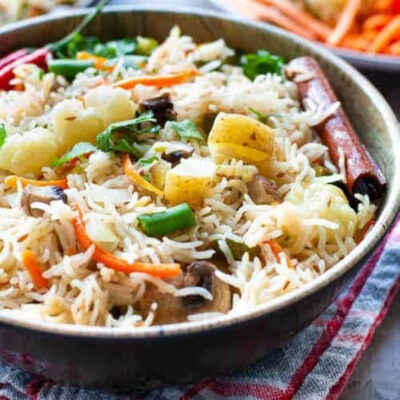
Easy Veg Pulao Recipe for Busy Days!
When you want something comforting, nutritious, and fast, veg pulao is the answer. Fragrant rice, colorful vegetables, and warm spices come together in one pot to create a satisfying meal. This easy veg pulao recipe for busy days is beginner-friendly, requires minimal prep, and delivers great taste in under 30 minutes.
Why You’ll Love This Veg Pulao
One-pot recipe
Ready in 25–30 minutes
Uses simple pantry ingredients
Light yet filling
Perfect for lunchboxes or quick dinners
Ingredients You’ll Need
Main Ingredients
1 cup basmati rice
2 cups water
1 tbsp oil or ghee
1 small onion, thinly sliced
1 tsp ginger-garlic paste
Vegetables (use what you have)
½ cup carrots
½ cup green peas
½ cup beans
½ cup potato or cauliflower
Whole Spices
1 bay leaf
1 small cinnamon stick
2–3 cloves
1–2 green cardamom pods
Ground Spices
½ tsp cumin seeds
Salt to taste
Optional: a few cashews or raisins for extra flavor
Step-by-Step Instructions
Step 1: Rinse and Soak Rice
Wash rice until water runs clear.
Soak for 15 minutes, then drain.
Step 2: Sauté the Aromatics
Heat oil or ghee in a pot or pressure cooker.
Add cumin seeds and whole spices.
Once fragrant, add onions and sauté until light golden.
Stir in ginger-garlic paste.
Step 3: Add Vegetables
Add chopped vegetables and sauté for 2–3 minutes.
Step 4: Add Rice and Water
Add soaked rice and gently mix.
Pour in water and add salt.
Bring to a boil.
Step 5: Cook
Stovetop: Cover and cook on low for 12–15 minutes
Pressure cooker: Cook for 1 whistle
Rice cooker: Cook as per normal rice setting
Let it rest for 5 minutes, then fluff gently.
Quick Tips for Perfect Veg Pulao
Use aged basmati rice for best aroma
Don’t over-stir after adding rice
Keep spice levels mild for balance
Let rice rest before fluffing
Adjust veggies based on availability
That’s why this truly is an easy veg pulao recipe for busy days.
Easy Variations
Coconut Veg Pulao
Replace water with coconut milk for a richer flavor.
Paneer Pulao
Add lightly sautéed paneer cubes before cooking.
South Indian Style
Add curry leaves and mustard seeds.
Microwave Version
Use a microwave-safe bowl and cook for 15–18 minutes.
What to Serve with Veg Pulao
Raita or yogurt
Simple salad
Pickle and papad
Boiled eggs or paneer curry
Storage Tips
Store leftovers in the fridge for up to 2 days
Reheat with a splash of water to refresh rice
Common Mistakes to Avoid
Using too much water
Overcooking rice
Adding too many spices
Stirring rice frequently
Conclusion
This easy veg pulao recipe for busy days proves that quick meals can still be delicious and wholesome. With simple ingredients, minimal prep, and one pot, you can have a comforting homemade dish ready in no time.
Perfect for hectic weekdays, lazy weekends, or when you just want something reliable and tasty 🍚✨