If you’ve just brought home a Ninja-style ice cream maker (like the Ninja Creami) and you’re staring at the container wondering what to do next, this guide is for you. The Quick Ninja Cream Recipe Recipe You Need is all about creamy, scoopable frozen desserts with minimal fuss, everyday ingredients, and tons of flavor options.
Whether you’re in the United States, United Kingdom, or Canada, this simple method works with ingredients you can find at any regular supermarket—and you don’t need to be a pro to get ice-cream-shop results.
Why This Is the Quick Ninja Cream Recipe Recipe You Need
There are thousands of frozen dessert recipes online, but many of them are complicated, use odd ingredients, or take forever. The Quick Ninja Cream Recipe Recipe You Need keeps things simple and flexible:
Uses a basic “master base” you can flavor any way you like
Works with dairy or non-dairy milks
Includes high-protein, lighter, and indulgent options
Gives you a creamy texture without weird additives
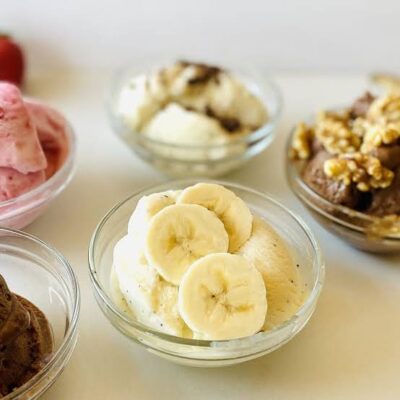
Once you master this quick Ninja cream recipe, you can create endless variations—vanilla, chocolate, strawberry, cookies & cream, or even protein ice cream for the gym days.
The Basic Ninja Cream Base
Let’s start with a simple, reliable base you can adapt. This is the heart of the Quick Ninja Cream Recipe Recipe You Need.
Classic Vanilla Cream Base (1 pint / ~470 ml)
Ingredients
1 cup (240 ml) whole milk or 2% milk
½ cup (120 ml) heavy cream (double cream in the UK)
¼–⅓ cup (50–70 g) granulated sugar (adjust to taste)
1–2 tsp vanilla extract
Pinch of salt
Instructions
In a mixing jug or bowl, whisk together the milk, cream, sugar, vanilla, and salt until the sugar is fully dissolved.
Pour the mixture into your Ninja Creami/Ninja Cream container up to the max fill line.
Put the lid on and freeze the container completely flat for at least 12–24 hours, until solid.
When it’s fully frozen, process according to your machine’s instructions (usually using the “Ice Cream” or similar setting).
That’s the basic framework behind the Quick Ninja Cream Recipe Recipe You Need—from here, it’s easy to customize.
Flavor Variations for Your Quick Ninja Cream Recipe
Once you have the base, you can mix and match flavors to suit your taste and dietary needs.
H3: Rich Chocolate Ninja Cream
For chocolate fans, this twist is simple:
Adjust the base:
Add 2–3 tbsp unsweetened cocoa powder
Optionally add 1–2 tbsp chocolate syrup for extra richness
Method:
Whisk cocoa powder into the milk first so it fully dissolves—no dry clumps.
Add cream, sugar, vanilla, and salt, then whisk until smooth.
Freeze and process like the vanilla base.
This chocolate version is another strong contender for the Quick Ninja Cream Recipe Recipe You Need because it tastes like a premium tub without the premium price.
H3: Fruity Ninja Cream (Strawberry or Mixed Berry)
Ingredients:
¾ cup (180 ml) milk
½ cup (120 ml) cream
½–¾ cup (80–100 g) fresh or frozen berries
¼ cup (50 g) sugar
1 tsp lemon juice
Pinch of salt
Method:
Blend the berries with the milk until smooth.
Stir in the cream, sugar, lemon juice, and salt.
Taste the mixture—add a bit more sugar if your berries are tart.
Freeze and process.
This fruity spin is perfect for summer in Canada, the UK, or the US—refreshing, colorful, and still using the same Quick Ninja Cream Recipe Recipe You Need master method.
H3: High-Protein Ninja Cream (Yogurt or Protein Shake Base)
If you want a lighter option for after the gym or a healthier dessert:
Option 1: Greek Yogurt Base
1 cup (240 g) plain Greek yogurt
½ cup (120 ml) milk
2–3 tbsp honey or maple syrup
1 tsp vanilla
Optional: a scoop of protein powder
Option 2: Protein Shake Base
1½ cups (360 ml) ready-mixed protein shake (any flavor)
1–2 tbsp sweetener if needed
Optional: 2 tbsp peanut butter or almond butter
Mix, freeze, and process as usual. These versions are still part of the Quick Ninja Cream Recipe Recipe You Need because they rely on the same simple steps with slightly different ingredients.
Step-by-Step: From Freezer to Creamy Dessert
Even the best recipe can go wrong without good technique. Here’s how to make your Quick Ninja Cream Recipe Recipe You Need smooth and scoopable every time.
H3: 1. Freeze Properly
Always freeze the mixture for at least 12–24 hours.
The pint or container should be placed flat so the surface freezes evenly.
Make sure your freezer is on a cold enough setting—if the base is slushy at all, it won’t process correctly.
H3: 2. Use the Right Cycle
Depending on your Ninja device, you’ll typically use:
“Ice Cream” for standard creamy recipes
“Lite Ice Cream” or similar for low-fat or high-protein bases
“Sorbet” for fruit-based recipes
Always check your specific machine’s manual, but most follow this same pattern.
H3: 3. Don’t Panic if It’s Crumbly
After the first spin, your Ninja cream might look crumbly or powdery. That’s normal. Here’s how to fix it:
Use the “Re-spin” function on the machine.
If it still looks dry, add 1–2 tbsp of milk or cream, then re-spin again.
Within a couple of spins, your Quick Ninja Cream Recipe Recipe You Need should turn into a smooth, soft-serve-like texture.
H3: 4. Add Mix-Ins at the Right Time
If you want cookies, chocolate chips, brownie chunks, or nuts:
Once the base is processed and creamy, make a small well in the center.
Add your mix-ins (about 2–4 tbsp).
Run the “Mix-in” function if your machine has it, or stir by hand if not.
This keeps your pieces intact but evenly distributed.
Practical Tips for Perfect Ninja Cream Every Time
To really own the Quick Ninja Cream Recipe Recipe You Need, these small tricks make a big difference.
Use Room-Temperature Ingredients When Mixing
When you’re blending your base before freezing, room-temperature milk or cream tends to mix more easily with sugar, cocoa, or flavorings. Cold ingredients can sometimes cause clumps or gritty texture.
Dissolve Sweeteners Fully
If you’re using sugar, honey, or maple syrup, whisk until completely dissolved. Gritty sugar can cause an icy texture later.
Balance Sweetness
Frozen desserts taste less sweet once frozen. If your base tastes just right before freezing, it might feel a bit bland afterward. Aim for the base to taste slightly sweeter than you want the finished product.
Avoid Overloading with Mix-Ins
Too many cookies or candy bits can:
Make the texture crumbly
Overwhelm the base flavor
Make it hard for the machine to spin smoothly
Stick to a small handful (2–4 tbsp) per pint.
Use Dairy Alternatives Carefully
If you’re using oat milk, almond milk, or coconut milk:
Choose full-fat versions when possible for creamier results.
A mix of non-dairy milk + a little coconut cream can mimic dairy richness.
Plant-based versions can absolutely be part of the Quick Ninja Cream Recipe Recipe You Need, but they might need an extra re-spin to get ultra smooth.
How to Store and Serve Your Ninja Cream Desserts
Serving Right Away
Right after spinning, your Ninja cream usually has a soft-serve texture. You can:
Serve it immediately in bowls or cones
Top it with fruit, nuts, chocolate syrup, or sprinkles
Storing for Later
If you don’t finish the batch:
Smooth the top, put the lid back on, and freeze.
When you want to eat it again, let it sit at room temperature for 5–10 minutes or re-spin a short time (if your machine allows).
The Quick Ninja Cream Recipe Recipe You Need is perfect for make-ahead desserts, late-night cravings, or weekend treats without needing store-bought ice cream.
Conclusion
From classic vanilla to rich chocolate, fruity blends, and high-protein options, this really is the Quick Ninja Cream Recipe Recipe You Need in your kitchen toolkit. Once you understand the simple base, the freezing process, and how to spin it to the right texture, you can create endless frozen desserts with the push of a button.
Whether you’re in a small flat in London, a condo in Toronto, or a family home in Chicago, this quick Ninja cream recipe lets you skip the store-bought tubs and make your own custom flavors at home. Experiment with different milks, sweeteners, and mix-ins until you find your favorites.