If you’ve ever dreamed of baking your own fresh, tangy sourdough bread, it all begins with one essential ingredient — the sourdough starter. This bubbly, living mixture of flour and water is what gives sourdough its signature flavor, chewy texture, and golden crust. The best part? You can make it at home with just two ingredients and a little patience!
In this complete guide, you’ll learn how to make a sourdough starter from scratch, how to feed and care for it, and how to troubleshoot common issues — all explained step by step. So grab a jar, roll up your sleeves, and try this sourdough starter recipe today!
🌾 What Is a Sourdough Starter?
A sourdough starter is a natural mixture of flour and water that captures wild yeast and beneficial bacteria from the environment. Over a few days, it ferments and becomes active, bubbly, and tangy — the perfect base for making sourdough bread, pancakes, pizza dough, and more.
Unlike commercial yeast, a sourdough starter is alive and self-sustaining. Once you create it, you can keep it going forever with regular feedings. Think of it as a little kitchen pet — one that rewards you with delicious, homemade bread!
🥣 Ingredients You’ll Need
You only need two simple ingredients to make a homemade sourdough starter:
1 cup (120 g) whole wheat or all-purpose flour
½ cup (120 ml) filtered or distilled water (room temperature)
💡 Tip: Avoid chlorinated tap water, as chlorine can inhibit yeast growth.
🫙 Equipment Checklist
Before you start, gather these kitchen basics:
A clean glass jar or container (at least 16 oz capacity)
A wooden spoon or silicone spatula
A kitchen scale (optional, but great for accuracy)
A loose-fitting lid or clean kitchen towel with a rubber band
👩🍳 Step-by-Step: How to Make a Sourdough Starter
Follow this simple daily guide to create your own healthy, bubbly starter in about 5–7 days.
Day 1: Mix Flour and Water
Combine 1 cup flour and ½ cup water in your jar.
Stir until there are no dry spots — the texture should be thick but stirrable (like pancake batter).
Cover loosely and let it sit at room temperature (70–75°F / 21–24°C) for 24 hours.
💡 Tip: Place your jar in a warm, draft-free area like the top of your fridge.
Day 2: Check for Activity & Feed
You might notice a few bubbles — a good sign!
Discard half the starter (about ½ cup).
Add ½ cup flour and ¼ cup water. Stir well.
Cover loosely again and let rest for another 24 hours.
Day 3: Watch It Come Alive!
By now, your starter should have small bubbles and a tangy smell.
Discard half the mixture.
Feed again with ½ cup flour + ¼ cup water.
Stir thoroughly, cover loosely, and wait another day.
💡 Pro Tip: If your home is cool, place the jar near a warm appliance or use slightly warmer water (80°F / 26°C).
Day 4: Growing Stronger
Your starter should now double in size between feedings — a sure sign that it’s becoming active!
Continue the feed-discard routine once every 24 hours.
The aroma should be pleasantly sour, not unpleasant.
If it’s not bubbling much, don’t worry — sometimes it takes an extra day or two.
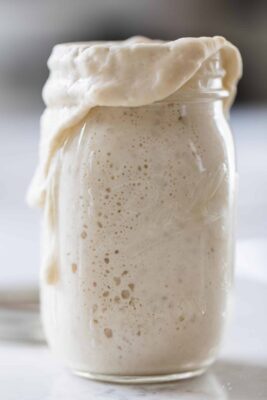
Day 5–7: Ready to Bake
By now, your starter should be:
Bubbly and airy
Doubling in size within 6–8 hours of feeding
Smelling slightly yeasty and tangy
Test if it’s ready:
Drop a small spoonful into a cup of water — if it floats, your starter is active and ready to use! 🫧
Congratulations — you’ve just made your very own sourdough starter from scratch!
🍞 How to Maintain Your Sourdough Starter
Once your starter is mature, you can keep it alive indefinitely with simple care:
If You Bake Often (every 1–2 days):
Keep the starter at room temperature.
Feed it daily with equal parts flour and water (by weight).
If You Bake Occasionally:
Store your starter in the refrigerator.
Feed it once a week to keep it active.
Before baking, take it out, feed it, and let it sit at room temperature for a few hours to reactivate.
💡 Feeding Ratio Example:
100 g starter + 100 g flour + 100 g water (1:1:1 ratio by weight).
🌿 Troubleshooting Common Problems
Even the best bakers run into starter hiccups! Here’s how to fix the most common ones:
Problem Likely Cause Solution
No bubbles after 3 days Too cold or chlorinated water Move to a warmer spot, use filtered water
Bad smell (rotten, cheesy) Contamination Discard and start fresh with clean utensils
Mold on top Unclean jar or exposure to air Discard — start a new batch
Hooch (gray liquid on top) Hungry starter Stir it back in and feed more often
💡 Pro Tip: If you forget to feed your starter for a few days, it can usually be revived with a couple of fresh feedings!
🥖 How to Use Your Sourdough Starter
Your active starter can be used in countless homemade recipes:
Classic sourdough bread
Pancakes or waffles
Pizza dough
Biscuits and muffins
Cinnamon rolls
Each recipe benefits from that signature tangy flavor and chewy texture only real sourdough can deliver.
🧡 Practical Tips for Success
Weigh your ingredients: Precision helps your starter develop consistently.
Be patient: It can take 5–10 days depending on temperature and flour type.
Use unbleached flour: Bleached flour lacks nutrients wild yeast needs.
Label your jar: Write feeding times and dates to stay consistent.
Share the love: Once your starter is strong, gift some to a friend — it’s a baker’s tradition!
🌾 Conclusion: A Simple Start to Amazing Bread
Creating your own sourdough starter may seem magical, but it’s really just nature at work — a perfect balance of flour, water, and time. With this easy sourdough starter recipe, you’re only a few days away from baking your first loaf of flavorful, naturally leavened bread.
So don’t wait — try this sourdough starter recipe today and join the community of home bakers who’ve discovered the joy of real sourdough. Once you start, you’ll never look back! 🍞✨