In Japanese cuisine, few foods are as comforting, versatile, and iconic as onigiri — the humble rice ball. Whether filled with savory tuna, salty salmon, or tangy pickled plum, onigiri is both a quick snack and a cultural staple. Its simplicity and portability make it one of Japan’s most beloved comfort foods.
And the best part? You can easily make onigiri at home with simple ingredients and a little technique. In this guide, you’ll learn how to transform your cooking with this onigiri recipe recipe, explore traditional and creative fillings, and discover tips that will take your homemade onigiri to the next level.
What is Onigiri? 🇯🇵
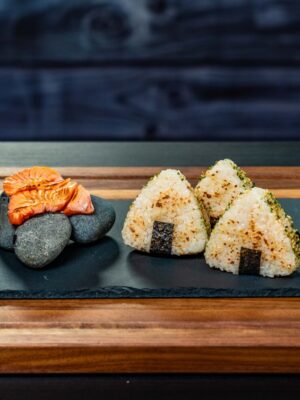
Onigiri (also called omusubi) is a traditional Japanese dish made from plain rice shaped into a ball, triangle, or cylinder, often wrapped with a strip of nori (seaweed). Unlike sushi, onigiri uses plain salted rice rather than vinegared rice.
It’s:
Portable – Perfect for packed lunches or picnics.
Customizable – Works with a variety of fillings.
Comforting – A simple, everyday Japanese food with deep cultural roots.
Ingredients You’ll Need 🛒
Basic Onigiri:
2 cups Japanese short-grain rice (sushi rice works best)
2 ½ cups water (for cooking)
1 tsp salt
Nori sheets, cut into strips
Popular Fillings:
Grilled salmon flakes
Tuna mayo (canned tuna + mayonnaise)
Umeboshi (pickled plum)
Seasoned kombu (kelp)
Teriyaki chicken
(Feel free to experiment with your favorite ingredients — even cheese, avocado, or spicy fillings.)
Step-by-Step Onigiri Recipe 👩🍳
Step 1: Cook the Rice
Rinse rice several times until water runs clear.
Cook rice in a rice cooker or pot with measured water.
Let it steam for 10 minutes after cooking for fluffier texture.
Step 2: Season the Rice
Lightly sprinkle salt on your hands before shaping (this adds flavor and prevents sticking).
Step 3: Shape the Onigiri
With damp, salted hands, scoop about ½ cup of rice.
Place a small amount of filling in the center.
Gently press rice around the filling and shape into a triangle or ball.
Step 4: Wrap with Nori
Wrap each onigiri with a strip of nori just before serving to keep it crisp.
Tips for Perfect Onigiri Every Time 🌟
Use short-grain rice – Long-grain rice won’t stick together properly.
Don’t overstuff – A small amount of filling works best.
Keep hands moist – Prevents rice from sticking while shaping.
Wrap last minute – Nori stays crisp if added right before eating.
Store properly – Wrap onigiri in plastic wrap if packing for lunch, but avoid refrigerating as rice can harden.
Creative Onigiri Variations 🍴
Yaki Onigiri (Grilled Onigiri) – Brush with soy sauce and grill until crispy.
Mixed Rice Onigiri – Mix fillings like furikake (seasoning) or sesame seeds into rice before shaping.
Western Fusion – Try fillings like teriyaki beef, cheese, or even spicy sriracha tuna.
Why This Onigiri Recipe Will Transform Your Cooking 🍙
Quick & Easy – Simple ingredients, minimal prep.
Healthy – High in carbs and protein, depending on your filling.
Kid-Friendly – Fun shapes and mild flavors kids love.
Meal-Prep Friendly – Great for lunch boxes, road trips, or snacks.
Conclusion ✨
By learning this onigiri recipe recipe, you’ll not only add a Japanese classic to your cooking repertoire but also unlock endless possibilities for quick meals, snacks, and creative fillings. Whether you prefer traditional flavors like salmon and umeboshi or modern twists with cheese and spicy tuna, onigiri proves that simple food can be deeply satisfying.
So next time you’re looking for a delicious yet easy dish, remember: transform your cooking with this onigiri recipe recipe and enjoy a bite of Japan right at home! 🍙💛